

Why Kitchen Sink Drain Repair Matters for Your Home
Kitchen sink drain repair is one of the most common plumbing issues homeowners face, and it’s often more manageable than you might think. A leaky sink drain isn’t just a nuisance—it can lead to water damage, mold growth, and costly repairs if left unchecked. The good news? Most kitchen sink drain leaks can be fixed with basic tools and a little know-how, saving you money on professional repairs.
Quick Answer: Most Common Kitchen Sink Drain Repair Steps
- Turn off the water supply under the sink
- Identify the leak source (usually at slip nuts, washers, or the P-trap)
- Disassemble the drain assembly by loosening slip nuts
- Inspect and replace worn washers, gaskets, or cracked pipes
- Reassemble with new parts and test for leaks
Average professional repair cost: $150 to $850
DIY P-trap replacement cost: $10 to $100
Time required: About 1 hour for simple repairs
The most common culprits behind kitchen sink drain leaks are loose connections, worn-out washers and gaskets, and corroded pipes. These problems often start small—a minor drip here, a damp spot there—but they can quickly escalate into bigger headaches. Early detection is key. A musty smell under your sink, visible moisture on pipes, or water stains in your cabinet are all warning signs that shouldn’t be ignored.
Understanding how your sink drain works is the first step to fixing it. The U-shaped pipe beneath your sink (called a P-trap) does more than just drain water—it holds a small amount of standing water that prevents sewer gases from entering your home. It’s also where most leaks occur, making it the focal point of many kitchen sink drain repair projects.
I’m Chris Hoffman, a Master Plumber with over 25 years of hands-on experience in residential plumbing and kitchen sink drain repair. Throughout my career, I’ve helped countless homeowners in the Denver Metro and Elbert County areas tackle these exact issues, and I’m here to guide you through the process step by step.
Pinpointing the Problem: How to Find Your Sink Leak
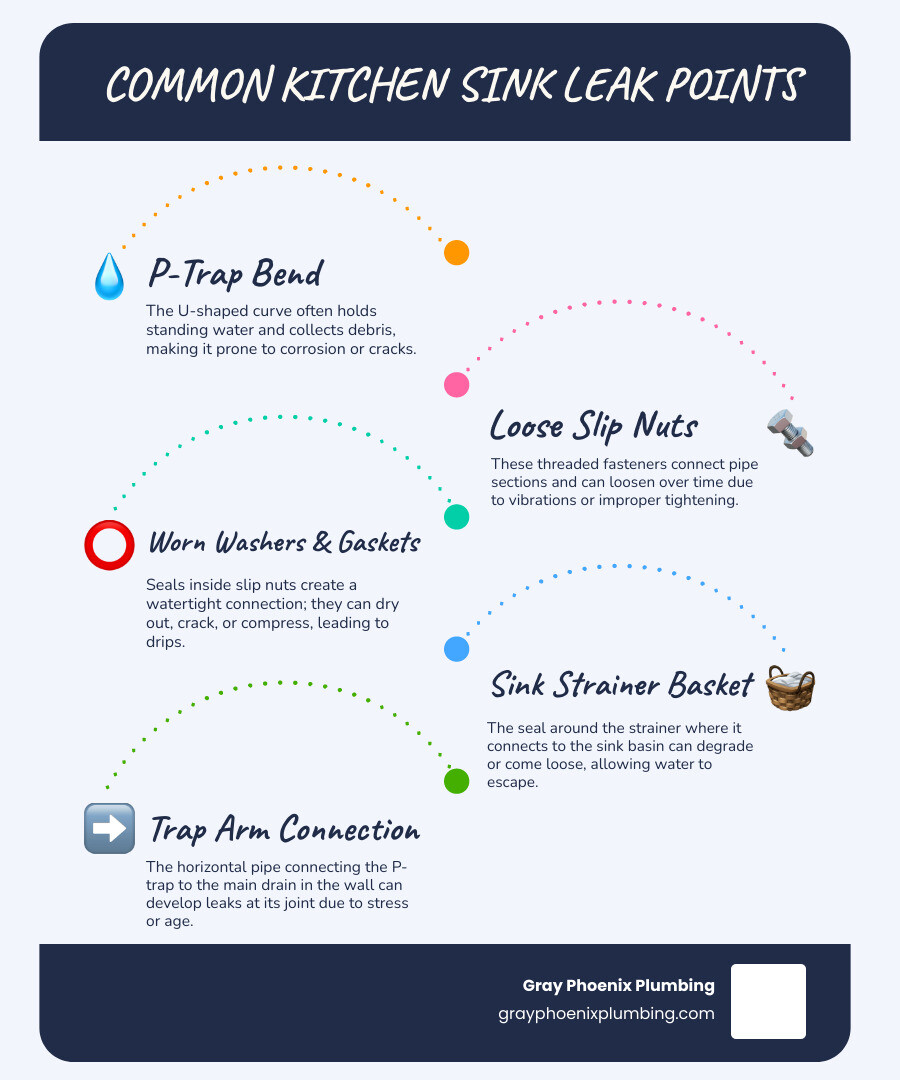
Before you can tackle any kitchen sink drain repair, you need to play detective and find the source of the leak. Early warning signs often give us a head start. Have you noticed a persistent musty odor coming from under your sink? Are there any water stains on the bottom of your cabinet or on the floor? Even subtle signs like visible corrosion or rust on pipes should catch your eye. These are all indicators that something isn’t quite right and a leak might be brewing.
Identifying the exact source of the leak is crucial. We recommend starting with a simple, yet effective, method: the dry paper towel test. Clear everything out from under your sink cabinet. Then, place dry paper towels or a few sheets of newspaper directly under the entire drain assembly, paying close attention to all connections and the P-trap. Now, run water into your sink, letting it fill up a bit, and then release it. Watch closely to see where the first drip appears on your paper towels. This will help us pinpoint the problem area.
Most sink drain leaks stem from a few common culprits:
- Loose connections: Over time, vibrations and the constant flow of water can cause slip nuts to loosen. Sometimes, a simple tightening is all that’s needed to stop a drip.
- Worn-out washers or gaskets: These small, flexible rings create a watertight seal between pipe sections. When they harden, crack, or deteriorate, they can no longer hold water effectively, leading to leaks. This is a very common cause of leaks.
- Corroded pipes: Older metal pipes are susceptible to corrosion, which can lead to pinhole leaks or larger cracks. If you see significant rust or deterioration, replacement is usually the best option.
- Clogged drains: While not a direct cause of leaks, a severe clog can create pressure within the drain system, exacerbating existing weaknesses or causing water to back up and overflow from the sink or connections.
The Role of the P-Trap
The P-trap, that distinctive U-shaped bend in the pipe directly under your sink, is a plumbing marvel. Its primary function is quite ingenious: it holds a small amount of standing water. This water acts as a barrier, preventing unpleasant and potentially harmful sewer gases from entering your home. Without a functional P-trap, your kitchen would quickly become a very smelly place! In fact, plumbing codes like 3280.606 Traps and cleanouts. mandate its presence for health and safety.
Beyond blocking odors, the P-trap also serves as a handy catch-all for small dropped items, like a lost wedding ring. It’s also a convenient spot to clear clogs. However, this hard-working component can also be a major contributor to leaks.
Here’s how P-traps often contribute to leaks:
- Loose connections: Just like other drain components, the slip nuts connecting the P-trap to the tailpiece and the wall drain can loosen, leading to drips.
- Worn washers: The rubber or nylon washers inside these slip nuts can harden or crack, compromising the seal.
- Misalignment: If the P-trap or connecting pipes are not perfectly aligned, it puts stress on the connections, leading to leaks.
- Cracks: While less common in newer PVC or ABS, older or stressed P-traps can develop cracks, especially if they’ve been subject to impact or extreme temperatures.
- Clogs causing pressure: A stubborn clog within the P-trap or further down the drain line can cause water to back up, putting pressure on seals and exacerbating any existing leak points.
Understanding the P-trap’s critical role and its vulnerability is key to effective kitchen sink drain repair. If you suspect a leak but can’t find it, our team at Gray Phoenix Plumbing can help with our water leak detection services. For more information, you can always check out our water leak detection services.
Gearing Up: Tools and Materials for the Job
Before we dive into the nitty-gritty of kitchen sink drain repair, let’s make sure we have all our ducks in a row – or rather, all our tools and materials laid out neatly. Having everything at hand will make the job smoother and less frustrating. Trust us, there’s nothing worse than being halfway through a repair and realizing you need to make a hardware store run!
Essential Tools and Materials for Kitchen Sink Drain Repair
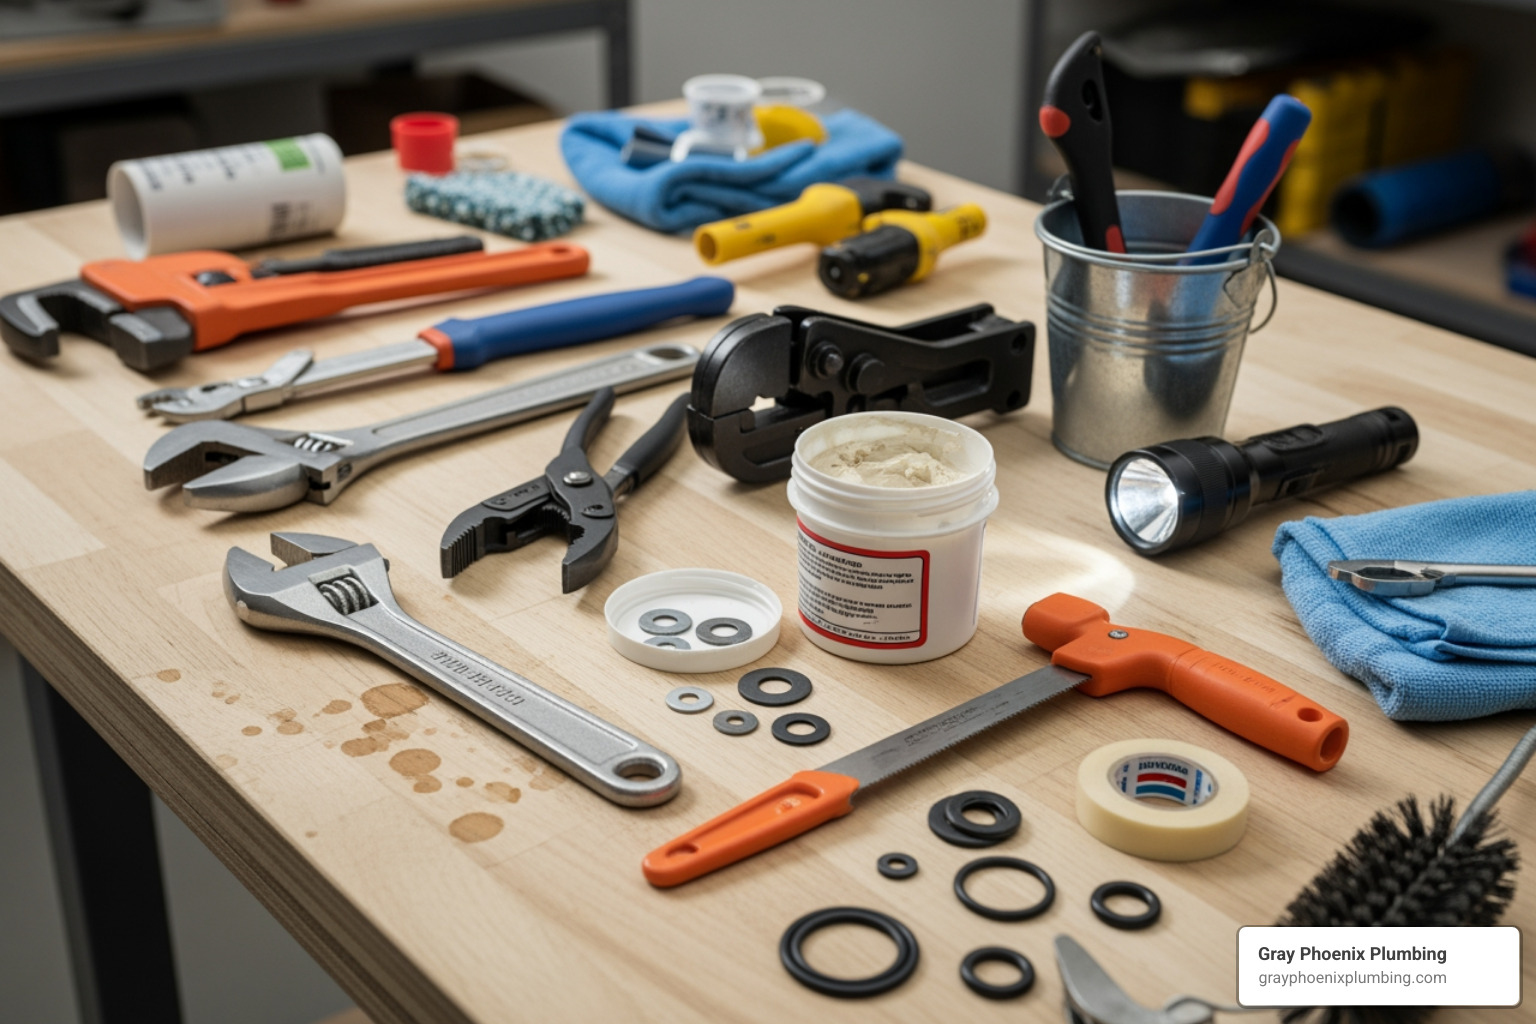
Here’s a comprehensive list of what you’ll typically need for a successful kitchen sink drain repair:
- Bucket or pan: Essential for catching residual water when disassembling the drain. We promise, it’s going to be messier than you think!
- Rags or paper towels: For wiping up spills and checking for leaks.
- Pliers:
- Slip-joint pliers (also known as tongue-and-groove pliers or Channellock pliers): These are your best friend for loosening and tightening slip nuts. Their adjustable jaw makes them versatile.
- Wrench: An adjustable wrench might also come in handy, especially for the sink basket strainer nut.
- Screwdriver: You might need a flathead or Philips head screwdriver if you have a garbage disposal or specific mounting hardware.
- Flashlight or headlamp: Under-sink cabinets are notoriously dark. A good light source will illuminate your workspace.
- Plumber’s Putty: Used to create a watertight seal around the sink flange or basket strainer.
- Plumber’s Tape (Teflon Tape): For threaded connections, ensuring a tight, leak-free seal.
- Replacement Washers/Gaskets: It’s always a good idea to have a variety on hand, or better yet, take your old, worn-out ones to the hardware store to find exact matches.
- New P-trap kit (if needed): If your P-trap is cracked or heavily corroded, a complete replacement kit will be necessary. These usually include the trap bend, trap arm, and new slip nuts and washers.
- Hacksaw or PVC cutter (optional): If you need to cut a new trap arm to size.
A simple P-trap replacement can often be completed in about an hour and cost between $10 to $100 for parts, saving you a considerable amount compared to the average professional repair cost of $150 to $850. DIY truly pays off here!
Understanding Drain Pipe Materials
When it comes to your sink’s drain pipes, you’ll typically encounter three main types of materials: PVC, ABS, and metal (often chromed brass or copper). Each has its own characteristics, impacting durability, ease of repair, and cost. Understanding these differences can help you choose the right replacement parts and understand why your current setup might be failing. For more general information on plumbing pipes, you can check out this resource.
Here’s a quick comparison:
| Material | Cost | Durability | Ease of Installation | Common Issues |
|---|---|---|---|---|
| PVC (Polyvinyl Chloride) | Low | High | Easy (slip-joint or solvent weld) | Can be brittle if exposed to certain chemicals; petroleum-based sealants can degrade it. |
| ABS (Acrylonitrile Butadiene Styrene) | Low | High | Easy (solvent weld) | Similar to PVC, but typically black. |
| Metal (Chromed Brass/Copper) | High | Moderate | Moderate (threaded or slip-joint) | Susceptible to corrosion over time, especially at joints; can be harder to work with. |
-
PVC (Polyvinyl Chloride): This is the most common material we see in modern kitchen sink drain repair in areas like Elizabeth, CO, and across Colorado. It’s inexpensive, highly durable, and very easy to work with, especially for DIY projects. PVC pipes and fittings are typically white and connect using slip-joint nuts or solvent cement. A major benefit is that PVC doesn’t corrode like metal pipes, making it a long-lasting solution. However, be mindful that petroleum-based sealants can degrade PVC, so always use appropriate sealants.
-
ABS (Acrylonitrile Butadiene Styrene): Similar to PVC, ABS is another plastic option, usually black in color. It’s also durable and easy to install, often using solvent welding. Both PVC and ABS are excellent choices for drain lines due to their resistance to corrosion and relatively low cost.
-
Metal (Chromed Brass/Copper): You’ll often find metal drain pipes, particularly chromed brass, in older homes or in situations where aesthetics are a priority. While they look nice, metal pipes are more prone to corrosion over time, especially at the joints where different metals might meet or where water sits. This corrosion can lead to leaks, making kitchen sink drain repair more frequent. They are also generally more expensive and can be a bit trickier to work with for the uninitiated.
When replacing parts, you can often use the same material as your existing drain, or upgrade to a more durable and easier-to-work-with plastic option like PVC.
A Step-by-Step Guide to Kitchen Sink Drain Repair
Alright, let’s get our hands dirty (but not too dirty, we hope!). Tackling kitchen sink drain repair yourself can be a rewarding experience, saving you time and money. A simple P-trap replacement, for instance, often takes us about an hour. We’ll guide you through each step, ensuring safety and a watertight seal.

First things first: safety. Always proceed with caution. Clear out everything from under your sink cabinet to give yourself ample workspace. Grab your flashlight, bucket, and rags, and let’s begin!
Step 1: Turn Off the Water and Prepare Your Workspace
This is perhaps the most critical first step in any plumbing repair. Skipping this step can turn a small leak into a big flood!
- Locate the shutoff valves: Look directly under your kitchen sink. You should see two small valves connected to the hot and cold water lines leading to your faucet.
- Turn off the water: Rotate the handles of these valves clockwise until they are fully closed. This is usually “righty-tighty.”
- Check for residual water: Turn on your kitchen faucet to release any remaining water pressure and drain the lines. The flow should slow to a trickle and then stop. If it doesn’t stop, the valves might not be fully closed or could be faulty.
- Main water shutoff (if necessary): If the under-sink valves aren’t working, you’ll need to turn off the main water supply to your house. This is usually located in your basement, crawl space, utility room, or outside near your water meter.
- Prepare for spills: Place your bucket or pan directly under the P-trap and drain assembly. Lay down some old rags or newspaper to catch any drips or spills.
- Clear the cabinet: Remove all items from under your sink to give yourself plenty of room to work.
Step 2: Disassemble the Drain Assembly
With the water safely off and your workspace prepped, it’s time to take things apart.
- Start with the slip nuts: These are the large, threaded nuts that connect the various sections of your drain pipes, especially around the P-trap. Using your hands or your slip-joint pliers, carefully unscrew these nuts by turning them counter-clockwise.
- Remove the P-trap: This is the U-shaped bend. Be careful when removing it, as it will likely contain residual water and possibly some delightful gunk. Make sure your bucket is in place to catch it all.
- Continue disassembling: Depending on where your leak is, you might need to remove other sections, such as the tailpiece (the vertical pipe extending from the sink strainer) or the trap arm (the horizontal pipe connecting to the wall drain).
Step 3: Inspect, Clean, and Replace Parts
Now that the components are apart, it’s inspection time!
- Check for cracks: Carefully examine all pipe sections, especially the P-trap, for any cracks or damage. If you find any, the component needs to be replaced.
- Inspect washers and gaskets: Look closely at the rubber or nylon washers and gaskets that were inside the slip nuts. Are they hardened, cracked, flattened, or brittle? These are common culprits for leaks. If they show any signs of wear, replace them. We find that worn-out washers are one of the most frequent causes of leaks we see in homes across Denver, Aurora, and Castle Rock.
- Clean debris: If you plan to reuse any components, thoroughly clean out any accumulated hair, grease, or food debris from inside the pipes.
- Match replacement parts: If you need new washers, gaskets, or a new P-trap, it’s best to take the old, worn parts to your local hardware store. This ensures you get exact matches for size and material.
Step 4: Reassemble and Ensure a Watertight Seal
This is where your kitchen sink drain repair comes together! Reassembly is essentially the reverse of disassembly, with a few crucial steps to ensure a watertight seal.
- Proper washer placement: Ensure that all new or reused washers and gaskets are correctly seated within the slip nuts. They should fit snugly against the pipe ends.
- Applying plumber’s putty or tape:
- If you removed the sink basket strainer, apply a thin bead of plumber’s putty around its underside before seating it in the sink opening. Tighten the nut underneath the sink, and wipe away any excess putty that squeezes out.
- For threaded connections (like those for a garbage disposal or certain tailpieces), wrap plumber’s tape clockwise around the threads before connecting.
- Hand-tighten first: Begin by hand-tightening all slip nuts. This helps ensure that the threads are properly engaged and that the pipes are aligned.
- Final tightening with pliers: Once hand-tightened, use your slip-joint pliers to give each nut an additional quarter to half-turn. The goal is snug, not overly tight.
- Avoid over-tightening: This is critical, especially with plastic (PVC or ABS) pipes. Over-tightening can strip threads, crack plastic, or deform washers, leading to new leaks or even more significant damage. For metal traps, hand-tighten plus about a half turn with pliers. For plastic traps, hand-tighten and, if needed, give about a quarter turn with pliers.
Step 5: Testing Your Kitchen Sink Drain Repair
The moment of truth! After all your hard work, it’s time to see if your kitchen sink drain repair was successful.
- Turn the water supply back on: Slowly turn the hot and cold water shutoff valves back on (counter-clockwise).
- Fill the sink basin: Close the sink stopper and fill the sink basin halfway or even completely with water. This creates good pressure to test your new seals.
- Release the water: Pull the stopper and let all the water drain out.
- Check for drips: Immediately get back under the sink with your flashlight. Inspect every connection you touched, looking for any drips or signs of moisture. Run water for a few minutes, checking continuously. If you find a drip, try tightening the specific slip nut a little more (a tiny adjustment can make a big difference).
- Overnight check: For very slow, sneaky drips, place a dry piece of newspaper or fresh paper towels under the entire assembly overnight. In the morning, check for any damp spots. If it’s still leaking, you might need to re-evaluate the washers, putty, or even replace the entire section.
Congratulations! With these steps, you’ve likely resolved your leaky kitchen sink drain.
When to Call a Professional
While many kitchen sink drain repair issues are DIY-friendly, there are times when calling in a professional plumber is the smartest and safest course of action. We pride ourselves on serving homeowners in communities like Littleton, Parker, and Colorado Springs, and we’re always ready to help when a DIY fix isn’t enough.
Here’s when we recommend you put down the pliers and pick up the phone:
- Persistent leaks after DIY attempts: You’ve followed all the steps, replaced parts, and tightened connections, but the drip just won’t quit. This could indicate a more complex issue, like a hairline crack you missed or a problem further down the drain line.
- Major pipe corrosion or cracked pipes: If you find significant corrosion on metal pipes or a large crack in a plastic pipe that can’t be fixed by simply replacing a P-trap, it’s time for an expert. These issues often require cutting and replacing sections of pipe, which can be challenging without the right tools and experience.
- Complex plumbing systems: Your kitchen sink drain is more than just the P-trap. It connects to your garbage disposal, dishwasher, and potentially other appliances. If the leak involves these components, or if you have an older, more intricate plumbing system, a professional can diagnose and repair the issue without affecting other parts of your kitchen.
- If the job feels overwhelming: We understand that not everyone is comfortable working with plumbing, and that’s perfectly okay! If you feel out of your depth, or simply don’t have the time or patience, don’t hesitate to call. Trying to force a repair can lead to more damage and higher costs in the long run.
- Suspected hidden leaks: If you’re experiencing signs of a leak (musty smells, high water bills) but can’t pinpoint the source, it might be a hidden leak behind walls or under floors. Our team at Gray Phoenix Plumbing has specialized equipment for water leak detection services that can locate these elusive problems.
For reliable assistance with any plumbing challenge, big or small, don’t hesitate to Contact a trusted local plumber.. We’re here to provide expert service and peace of mind. You can also learn more about our comprehensive general plumbing services to see how else we can assist you.
Frequently Asked Questions about Kitchen Sink Drain Repair
We often get asked a lot of questions about kitchen sink drain repair from homeowners in areas like Denver, Aurora, and across Colorado. Here are some of the most common ones:
What are the most common causes of kitchen sink drain leaks?
Most leaks are caused by loose slip nuts, worn-out rubber or nylon washers at the connections, or corrosion on older metal pipes. Over time, vibrations and temperature changes can cause these parts to fail. We’ve seen countless cases where a simple worn-out washer was the culprit behind a persistent drip. Clogs can also exacerbate existing weaknesses by creating pressure within the drain system.
How can I prevent future sink drain leaks?
Prevention is always better than cure! We recommend a few simple habits:
- Regularly check under your sink: Every few months, take a peek under your sink with a flashlight. Look for any signs of moisture, corrosion, or rust on pipes and connections. Catching a small drip early can prevent major water damage.
- Avoid harsh chemicals and grease: Never pour cooking grease down your drain; it solidifies and creates stubborn clogs. Also, steer clear of harsh chemical drain cleaners, as they can corrode pipes and damage seals over time, leading to leaks.
- Use cold water with your garbage disposal: When using your garbage disposal, always run cold water. This helps solidify grease and food particles, allowing the disposal to grind them more effectively and prevent clogs.
Can I use a flexible, accordion-style pipe for my drain?
While flexible pipes might seem like an easy fix for awkward angles, most plumbers, including us, strongly advise against them for permanent installations. The corrugated ridges in these pipes are notorious for trapping food debris, grease, and hair, leading to frequent clogs and unpleasant odors. They also tend to be less durable and more prone to leaking over time. A smooth-walled PVC or ABS pipe is always the recommended choice for a long-lasting and efficient kitchen sink drain repair.
Conclusion
We hope this extensive guide empowers you to tackle your kitchen sink drain repair with confidence! From identifying the sneaky source of a leak to carefully reassembling your drain, you now have the knowledge and steps to perform many common repairs yourself. Embracing DIY projects like this not only saves you money (remember, a P-trap replacement can cost as little as $10-$100 in parts!), but it also builds your confidence in maintaining your home in places like Elizabeth, CO, and the broader Denver Metro area.
Addressing leaks promptly is crucial. Ignoring even a small drip can lead to significant water damage, mold growth, and much more expensive repairs down the line. However, we also know there are times when a plumbing problem is beyond a simple DIY fix. If you encounter persistent leaks, major pipe corrosion, or if the job simply feels too overwhelming, don’t hesitate to reach out. For complex issues or guaranteed peace of mind, trust the experts at Gray Phoenix Plumbing. We’re here to help.
Contact us for your emergency and sewer needs – we’re just a call away!


